Quick Overview
Having the right pitching mechanics is crucial for young players to avoid injury and improve their performance.
Key elements of pitching mechanics include grip, stance, windup, release point, and follow-through.
Drills like the Towel Drill and Knee Drill can help young pitchers develop consistency and power.
Avoiding common mistakes like overthrowing is important for maintaining good mechanics.
Consistent practice and routine are key to ongoing improvement in pitching mechanics.
Hello, future stars of the mound! If you’re between 8 and 12 years old and dream of striking out the side or just want to throw more strikes, you’re in the right place. Pitching is an art, and like any great artist, you need to master your craft. That means getting your pitching mechanics just right. Let’s take a look at how you can become the pitcher everyone’s talking about – for all the right reasons.
Let’s start with the basics: pitching mechanics are about more than just throwing a ball. They’re about doing it efficiently, consistently, and safely. When you pitch the right way, you can throw harder and more accurately. Plus, you can avoid injuries that could keep you off the field. So, let’s get started and learn how to pitch like a pro!

A Young Pitcher’s Journey: Perfecting the Craft
Before we dive into the details, let’s remember one thing: practice doesn’t just lead to perfection, it leads to permanence. What you practice is what you’ll end up doing. That’s why it’s crucial to get these mechanics right from the start. You’re laying the groundwork for your future pitching success.
Getting to Know the Basics of Pitching
Imagine your body as a well-oiled machine. Each part contributes to your pitching. Your legs are your powerhouse, your core is your anchor, and your arm is your weapon. But to use that weapon to its full potential, you need a solid foundation. That starts with a good, balanced posture.
Start with a solid stance. Your feet should be shoulder-width apart, your knees should be slightly bent, and your weight should be distributed evenly. This gives you the stability and the ability to move quickly in any direction. Remember, pitching isn’t just about your arm, it’s about your whole body working together.
Creating a Solid Pitching Technique from Scratch
Your technique is essentially the roadmap to a successful pitch. Every skilled pitcher has a technique that suits them, but they all have some common features:
Foot Placement: Your pivot foot (the foot you have on the rubber) should be angled slightly, not pointing directly at home plate. This aids in hip rotation.
Balance: Maintain your balance throughout your motion. If you’re wobbling around, your pitches will be all over the place.
Focus: Keep your eyes on the target from the beginning to the end. Your body follows your eyes, so look where you want the ball to go.
And remember, balance is key. You should be able to pause at any point in your motion and still feel steady. If you can’t, it’s time to slow down and work on that balance.
Essential Components of Successful Pitching Mechanics
Ball Grip: The Initial Move Towards an Excellent Pitch
The way you grip the ball is extremely important. Initially, hold the ball with your fingertips, not embedded in your palm. This allows for improved control and prevents you from applying undue strain on your arm. For more details on mastering this technique, explore our youth baseball pitching guide to enhance command and control skills. Here’s an easy method to confirm you’re doing it correctly:
Think about holding a baby bird in your hand. You wouldn’t want to let it escape, but you also wouldn’t want to hold it too tightly. That’s the same kind of grip you should have on a baseball.
For a simple four-seam fastball, place your index and middle fingers across the seams, with your thumb directly underneath on the smooth leather. This grip helps the ball go straight as an arrow as it shoots towards home plate.
Why is grip so important? The way you hold the ball influences everything from the speed of the pitch to its movement. For young pitchers, mastering the grip is the first step to throwing a pitch that not only gets batters out but also keeps your arm safe.

The Power Stance: Setting Up Your Body for the Perfect Pitch
After you’ve mastered the grip, it’s time to move on to your stance. The stance is the starting point of your pitch, and it sets the stage for everything that comes after. Here’s how to get into a power stance:
Position your feet shoulder-width apart, lined up with the rubber.
Place your pivot foot on the rubber and slightly open your other foot.
Slightly bend your knees to add some bounce to your legs.
This stance provides balance and allows you to use the power from your legs. Keep in mind, your arm isn’t the only part of your body throwing the ball – your entire body is. It all begins with a solid, stable stance.
Let’s now dissect the rest of the pitch into smaller components. We’ll take a look at the windup, the stride, the release, and the follow-through. Each component is a piece of the puzzle, and when you put them all together, you’ve got a complete pitcher’s motion that’s both powerful and precise.
Windup 101: Setting the Stage for Your Pitch
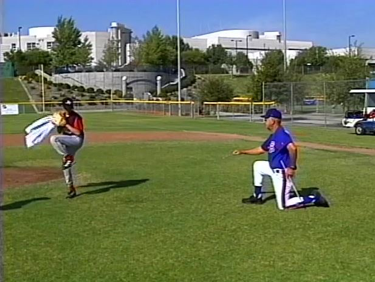
Your windup is like the introduction to a good story – it’s where the excitement begins. A solid windup establishes the tempo for your pitch. Begin by raising your lead leg, ensuring your hips and shoulders are squared to home plate. As you raise your leg, keep your glove tucked in close to your body – this aids in maintaining balance and prepares you to spring forward into your pitch.
Letting Go of the Ball: Timing Your Pitch for Strikeouts
The moment you let go of the ball is the moment of truth – it’s when the ball leaves your hand and hurtles towards the batter. To figure out the best moment to let go of the ball, practice throwing the ball at a target. The goal is to consistently let go of the ball at the same moment. This is crucial for accuracy. A good rule of thumb is to let go of the ball when your throwing arm has just passed your front leg, with your elbow at shoulder height. This is the ideal moment for a powerful, accurate pitch.
Understanding Follow-Through: Finishing the Pitch with Style
The follow-through is just as crucial as any other part of your pitch. It’s about ending on a high note and ensuring all the energy you’ve generated is transferred directly into the ball. After you let go of the ball, allow your arm to continue its natural downward and cross-body arc. Your back foot should rotate, and you should end up facing your target, ready to field any balls that come your way. A proper follow-through not only helps avoid injury but also ensures every bit of your effort matters.
Exercises for Building Accuracy and Strength
Towel Exercise: Refining Your Follow-Through
Here’s a fun exercise to practice your follow-through: the Towel Exercise. You’ll need a small towel and a partner. Hold the towel as you would a baseball, with the end hanging down. Go through your pitching motion, but instead of releasing a ball, snap the towel down and try to hit your partner’s hand with the end of the towel. This exercise helps you work on that snap at the end of your pitch, which can really make your fastball zip.
Knee Drill: Building Stability and Balance
The Knee Drill is designed to help build balance and stability in your pitch. Begin by kneeling on your back leg, with your front leg bent at a 90-degree angle and your foot flat on the ground. From here, perform your pitching motion. This drill makes you concentrate on your upper body mechanics and aids in the development of a strong, stable core – a key component of a powerful pitch.
Wall Drill: Improving Precision and Consistency
Precision is a pitcher’s greatest ally, and the Wall Drill is designed to help you improve consistency. Stand roughly an arm’s length away from a wall and perform your pitching motion, but instead of releasing the ball, tap the wall where you envision the strike zone to be. This helps you visualize your release point and trains your muscles to execute the precise motion to hit that strike zone each time.
Avoiding Common Mistakes
Overthrowing: Finding the Right Balance
It’s tempting to throw as hard as you can, especially when you’re excited or under pressure. But overthrowing can make your pitches less accurate, and it can even lead to injuries. Instead of trying to throw as hard as you can, focus on making your motion smooth and controlled. Remember, pitching is about skill and strategy, not just power. Try practicing with different levels of intensity to find the right balance.
Finding and Maintaining the Perfect Arm Slot
When it comes to pitching, the position of your arm when you let go of the ball, or your arm slot, is vital for consistency. If your arm slot isn’t right, your pitches won’t be either. Here’s a method to find your perfect arm slot:
Practice pitching with the aim of releasing the ball from the same point each time.
Request feedback from your coach or a teammate.
Take a video of yourself pitching to see if your arm slot shifts.
When you discover your optimal release point, focus on keeping it the same with each pitch. Consistency is crucial.
First and foremost, remember to maintain fluidity in your mechanics. Abrupt movements can disrupt your arm slot and result in off-target pitches. So, keep it fluid, as if you’re tracing a line in the air with each pitch.
Keep Your Eye on the Ball: The Importance of Concentration in Each Pitch
Every pitch begins with a thought. Concentration is key when it comes to achieving your goal with each throw. Before you step on the mound, take a deep breath and picture yourself throwing a strike. Maintaining a positive attitude will help you stay cool and composed, which is crucial for effective pitching.
Let’s be honest, baseball is as much a game of the mind as it is of the body. If your mind isn’t in the game, your pitches will reflect that. So, concentrate on the batter, the catcher’s mitt, and the sensation of the ball leaving your fingertips perfectly. That’s where you’ll find your rhythm.
Consistency: The Key to Ongoing Improvement
Setting Routine Practices: Building Muscle Memory
The best way to achieve consistency is to practice consistently. Establish a routine that you can adhere to, whether it’s a few times a week or every day. The more you practice, the more natural your pitching motion will become. It’s all about building that muscle memory so that when game day arrives, you can pitch with confidence, knowing your body knows what to do.
Follow Your Growth: Clearly Monitor Your Enhancements
Monitor your growth by recording each practice session – what you did well, what you didn’t do well, and what you want to focus on during your next practice. This allows you to see how much you’ve grown and where you need to direct your attention. And don’t hesitate to set goals for yourself, such as enhancing your pitch speed or boosting your precision. Goals provide you with a target and a method to monitor your achievements.
Adapting to Change: Growing as a Pitcher
As you mature and enhance your skills, your pitching method will need to adapt. Perhaps you’ll invent a new pitch or perfect your current ones. The secret is to remain open to change and constantly seek ways to improve. Collaborate with your coaches, observe other pitchers, and never stop acquiring knowledge. The best pitchers are the ones who never stop adapting and enhancing their game.
Keeping Your Pitching Game Strong
Finally, let’s conclude with a few thoughts on keeping your pitching game strong. It’s not just about the mechanics; it’s also about taking care of your body and your mind. A pitcher is like a well-oiled machine, and you need to treat yourself with care to stay at the top of your game. For more insight, explore our guide on fun drills and tips to foster passion for the game, which can help in maintaining both physical and mental sharpness on the mound.
How to Avoid Injuries: The Significance of Adequate Warm-up and Cool-down
Each pitching session must begin and conclude with an adequate warm-up and cool-down. This prepares your muscles for activity and aids in their recovery afterward. Stretching, jogging, and gentle throwing are all excellent methods to prepare your body for the game. And after you’ve finished pitching, make sure to stretch again to keep your muscles flexible and supple.
Keeping a Competitive Edge: Merging Technique with Tactics
Being a pitcher isn’t just about hurling the ball; it’s about outwitting the batter. Practice various pitches and understand when to utilize them. Vary your speeds and locations to keep the batter on their toes. Above all, collaborate with your catcher to formulate a game plan for each batter. Merging solid technique with clever tactics is what distinguishes a truly exceptional pitcher.
Always keep in mind that pitching is a process, not a final goal. There’s always something new to learn and a skill to improve, so keep practicing, keep studying, and keep aiming for your personal best. Now, let’s go out there and pitch!
Preventing Injury: Why Warming Up and Cooling Down is Essential
Just as you wouldn’t go for a full-out run without stretching first, you shouldn’t pitch without warming up. It’s vital to get your blood flowing and your muscles ready before you step onto the mound. Start with some light jogging and dynamic stretches that mimic your pitching motion. Then, gradually work your way up to throwing at full intensity. After your session, cool down with some more jogging and static stretches to help your muscles recover and prevent soreness. This routine helps reduce the risk of injuries that could sideline you from the game you love.
Stay Prepared: Merging Technique with Tactics
Great technique is only part of the equation. The other half is tactics. Learn to read batters and comprehend scenarios. Collaborate with your catcher to call the game. Recognize when to throw a fastball that zooms past the batter and when to decelerate it with an off-speed pitch that surprises them. By merging your strong technique with a keen intellect, you’ll become the pitcher that batters dread and coaches rely on in critical situations.
Long-Term Development: Understanding Growth and Limitations
As a young pitcher, your body is still growing, which means you have to be mindful of your limitations. Don’t try to do too much too soon. Focus on mastering the basics before moving on to more advanced pitches like curveballs and sliders. Listen to your body, and if something doesn’t feel right, take a break. Long-term development is about steady progress, not quick fixes. Trust the process, and you’ll see the results on the diamond. For more age-specific guidance, check out this comprehensive baseball and softball training for kids.
FAQs
Do you have questions? You’re not alone. Here are some of the most frequently asked questions about pitching mechanics from young pitchers and their parents:
When is the right time for children to start learning pitching mechanics?
Children can begin learning the essentials of pitching mechanics as early as 7 or 8 years old. At this stage, concentrate on basic movements and the principles of throwing. As they mature and develop physically, they can begin to improve their mechanics and learn various types of pitches.
How frequently should youth pitchers work on their mechanics?
Youth pitchers should work on their mechanics multiple times per week. Regularity is important, but so is equilibrium. Be sure to include days off to avoid overuse injuries and keep the game enjoyable. Keep in mind, quality is more important than quantity – it’s preferable to have a few concentrated, effective practices than to throw aimlessly every day.
Is it possible to practice pitching drills without a mound or catcher?
Definitely! A lot of drills can be performed anywhere – in your backyard, at the park, or even inside your house if there’s enough room. Use a wall or a net as a target if you don’t have a catcher. The important thing is to concentrate on your form and follow through, even if you’re not on a mound.
What are some indicators of poor pitching mechanics?
Inconsistent precision or control
Reduced velocity or power
Pain or discomfort during pitching
Feeling unsteady or unstable during your motion
If you see any of these indicators, it’s crucial to tackle them immediately. Collaborate with a coach to rectify your mechanics before they become deep-seated habits.
How can you teach mechanics while still making pitching enjoyable?
Make practices interesting by including games and challenges. For instance, have a competition to see who can hit a target the most or who can throw the most strikes. Recognize hard work and progress, not just the end result. And always strive to maintain a positive environment – celebrate the successful pitches and use the unsuccessful ones as learning opportunities. For more detailed guidance, check out this comprehensive youth baseball pitching guide to enhance command and control skills.
Are there specific exercises that can help a pitcher?
Yes, there are exercises that can help pitchers build strength and flexibility. Focus on exercises that strengthen the legs, core, and shoulders, like squats, planks, and resistance band workouts. Also, include exercises that improve flexibility and range of motion, like shoulder stretches and yoga. A well-rounded conditioning program will help you become a stronger, more resilient pitcher.
How can children remain inspired to practice regularly?
Establish objectives and monitor your improvement. Commemorate minor triumphs as you go. To keep things interesting, vary your practice routines. And don’t forget why you began playing baseball in the first place – because it’s enjoyable! Maintain that joy, and you’ll discover the drive to continue putting in effort. For more guidance on keeping young players motivated, check out these essential pitching drills for youth baseball.
Keep in mind, all amazing pitchers were once in your shoes. With hard work and the right mindset, you can grow into the pitcher you aspire to be.
When is it appropriate for young pitchers to start learning various pitches?
After you’ve got the fastball down and your mechanics are consistent, typically around ages 10 to 12, you can start to learn other pitches such as the changeup. More complicated pitches like curveballs should be held off until the mid-teens to make sure the arm is developed enough and to avoid injury. For a detailed guide on age-appropriate pitches, refer to MLB’s Pitch Smart guidelines.

Leave a Reply